Microsoft Word can be a mystery, I know. I have worked on manuscripts since way before Word came to be (back when we carried our precious documents from computer to computer on the 5-1/2 floppy — yes, actually floppy — disks). Well, and before that, I worked on an actual typewriter. But I digress. Over the years, I’ve seen the Microsoft Word program change and evolve, making life so much easier for all of us writers.
As I created both my Word by Wordbook, and then it’s companion titled Pathway to Publication, I wanted to give my readers material to help them with the formatting of their Word documents to the standards that most publishers require. In this post, I talked about some of those standards. In many of my “Let’s Get Tech-y” posts, I gave step-by-step instructions along with screenshots to help Word help you do what you need to do.
But guess what? I have now actually entered the world of YouTube <raucous applause>.
Minions image courtesy of GIFER
I mean, I currently have 8 videos and 2 followers, so I’m basically an influencer now.
In any case, I will continue to create simple videos to help writers navigate Microsoft Word on my YouTube channel (@lindataylor4207).
So far, I have the following videos for your enjoyment:
Hey you guys! I did a thing! I created a YouTube video on my very own YouTube channel that now has exactly ONE video!
It’s taken a while, but YES, YouTube!
In many of my previous tech-y posts, I’ve talked about how to work in Microsoft Word in order to prepare a manuscript to the industry standards. Agents and acquisitions editors are pleased when clients understand some of these basics and can put together a manuscript that has the key elements (as I noted in this post and various posts thereafter).
A feature of Microsoft Word that is somewhat unknown is style tagging. Word has a powerful way of either messing up your documents (despite your best-laid plans) or making them consistent and beautiful. You just need to know the process.
The purpose of this video came from my designer/typesetter friend who has been trying to explain to his clients why style tags are so necessary in the process of designing and typesetting books. He knows this is my wheelhouse, so he wrote and asked me to “please find a way to explain the why and how of style tagging!”
This can be helpful whether you’re a college student writing papers and trying to have consistent subheads or an author preparing your manuscript to be typeset.
(Note that this is sort of a step beyond what most people need to know. If you do all of the steps I’ve outlined in previous posts, you’ll be good to go.)
If, however, you’re considering self-publishing your book and creating it yourself, or if you hope to work in the publishing industry one day, understanding this part of the process of prepping manuscripts for typesetting (flowing the Word document into an InDesign program, for example), will show that you really know your stuff.
I teach style tagging to my Professional Writing students for that very reason.
And this process is much more complex than my previous posts where I could do screenshots; hence, the video. If this part of the process intrigues you, well here you go.
As I have time, I’ll go back through all of my tech-y posts and add an accompanying video.
Do you have any particular issues with Microsoft Word or with creating a manuscript that you have questions about? I’m happy to help, or at least try to find the answer for you. Let me know in the comments below, or write me through the contact form.
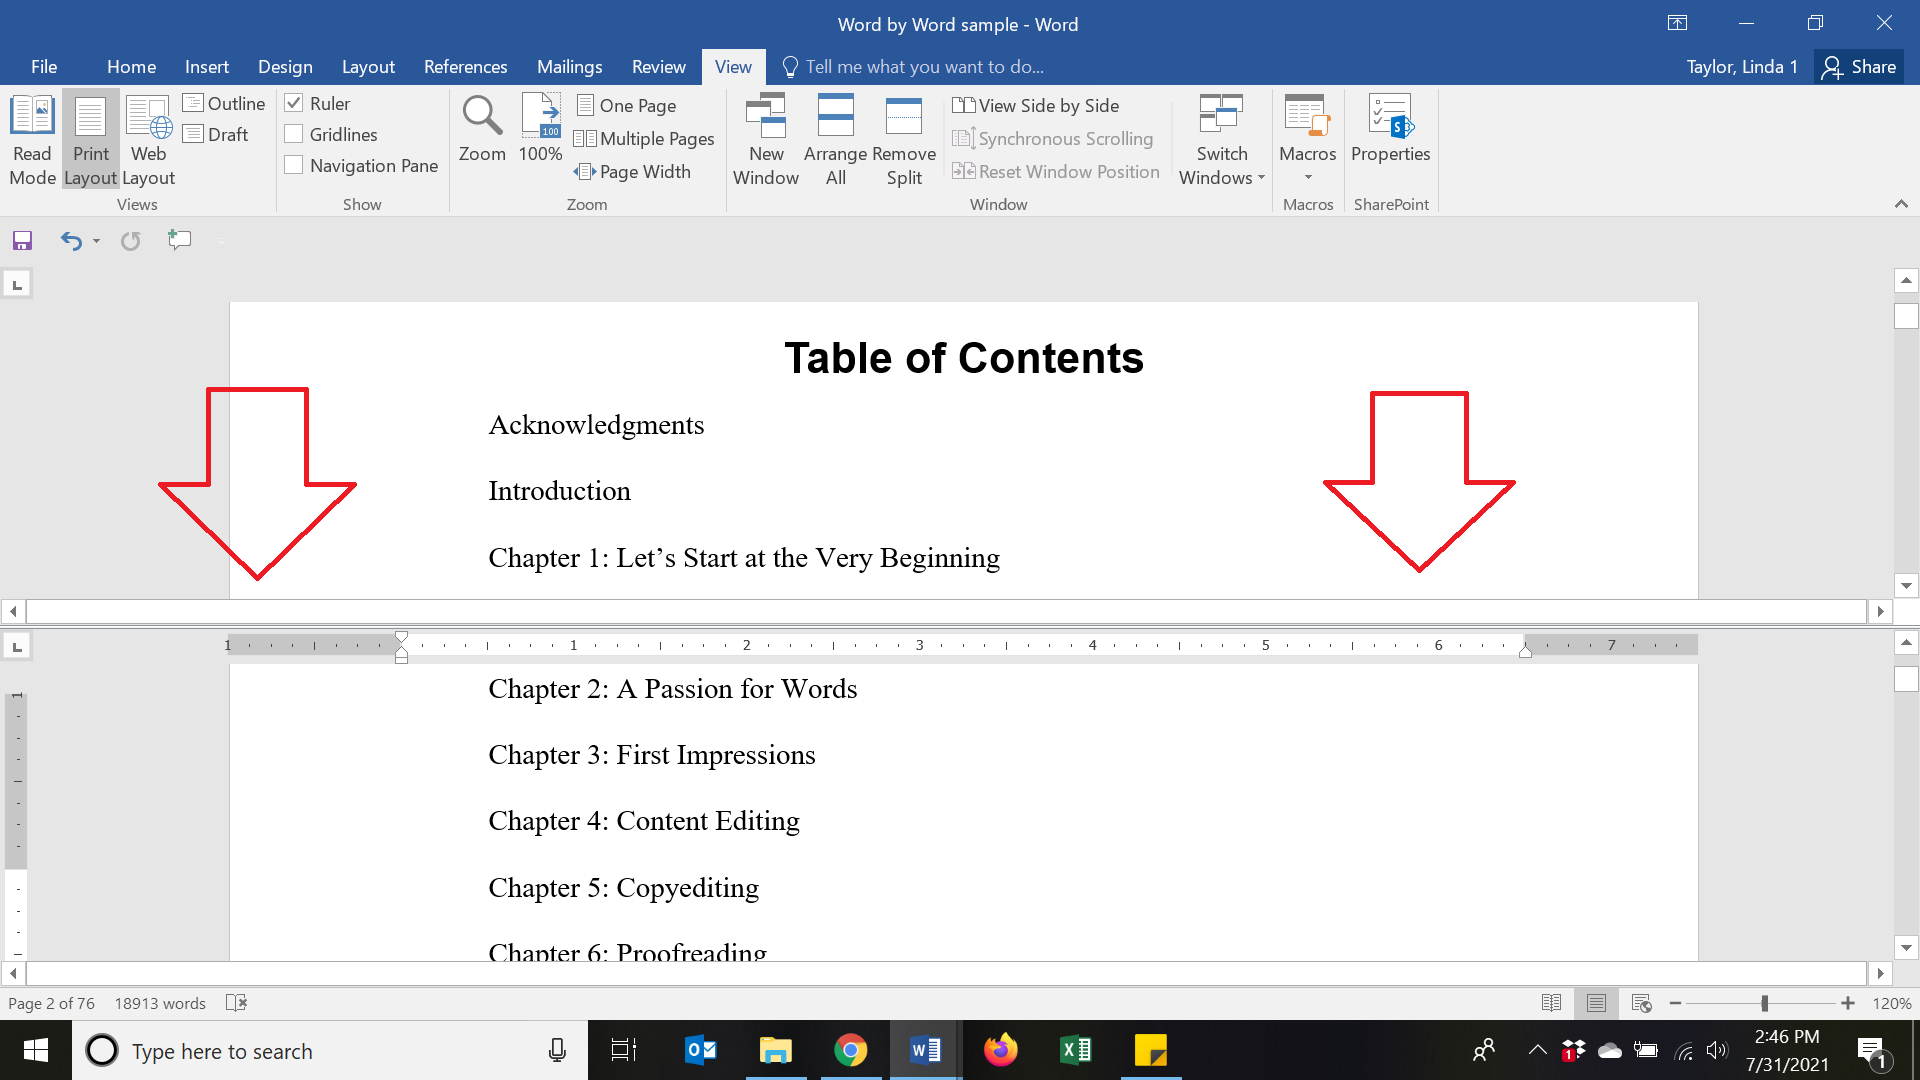
If you’re writing nonfiction, you will definitely need a Table of Contents (TOC). If your book is fiction, you may or may not include one.
You can prepare a TOC a couple of ways. While Microsoft Word does offer an automated feature, it can be a bit cumbersome to use if you don’t understand how to add style tags and use them on chapter titles. (I will be making a video on style tags next, and will also then show how to build a TOC this way.)
For now, if you want to not be overly tech-y and still get the job done without jumping back and forth in your manuscript, you can make use of the “Split Screen” feature. After the copyright page (or the dedication page if you included one), insert a page break, start at the top line and type “Contents” or “Table of Contents.” Insert a return. Place your cursor where you want to type the next entry that appears in the book (such as Acknowledgements, Introduction, Prologue, or Chapter 1, along with the name of the chapter if it has one).
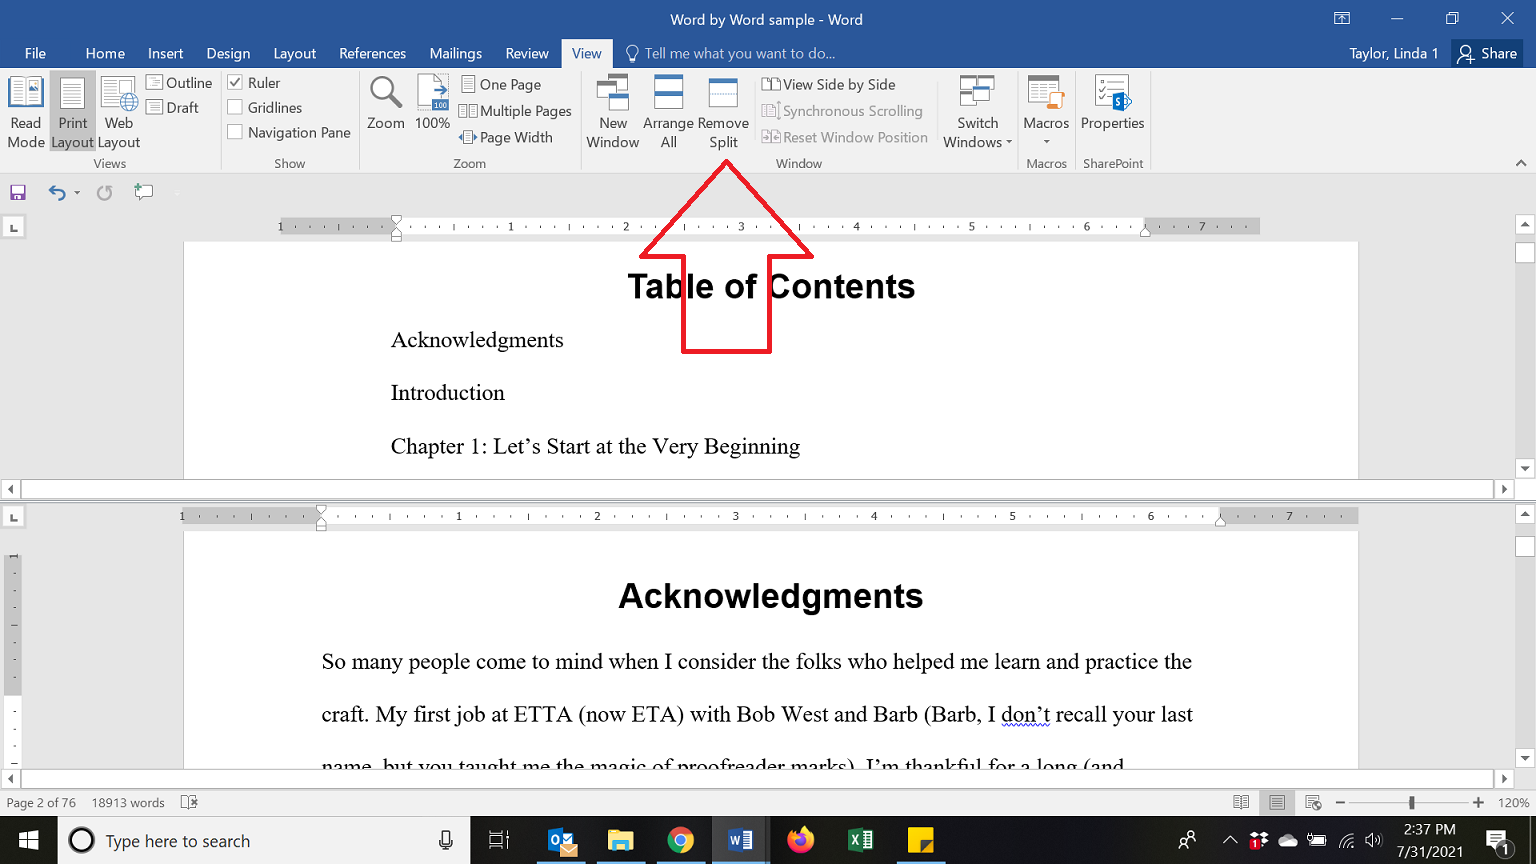
Now you need to split the screen. Navigate to the “View” tab. On that ribbon, you’ll see a button about halfway across that says “Split.” If you click that, a bar will appear that splits your screen.
The split screen allows you to scroll in one part of the screen while leaving the other part in place. Thus, you can keep the TOC page intact to keep typing and adding to while you scroll through your manuscript, stopping at each chapter and including the chapter title. This also helps make sure your TOC matches the actual titles in the manuscript itself. (I can’t begin to tell you how many times these don’t match in books I’ve proofread.)
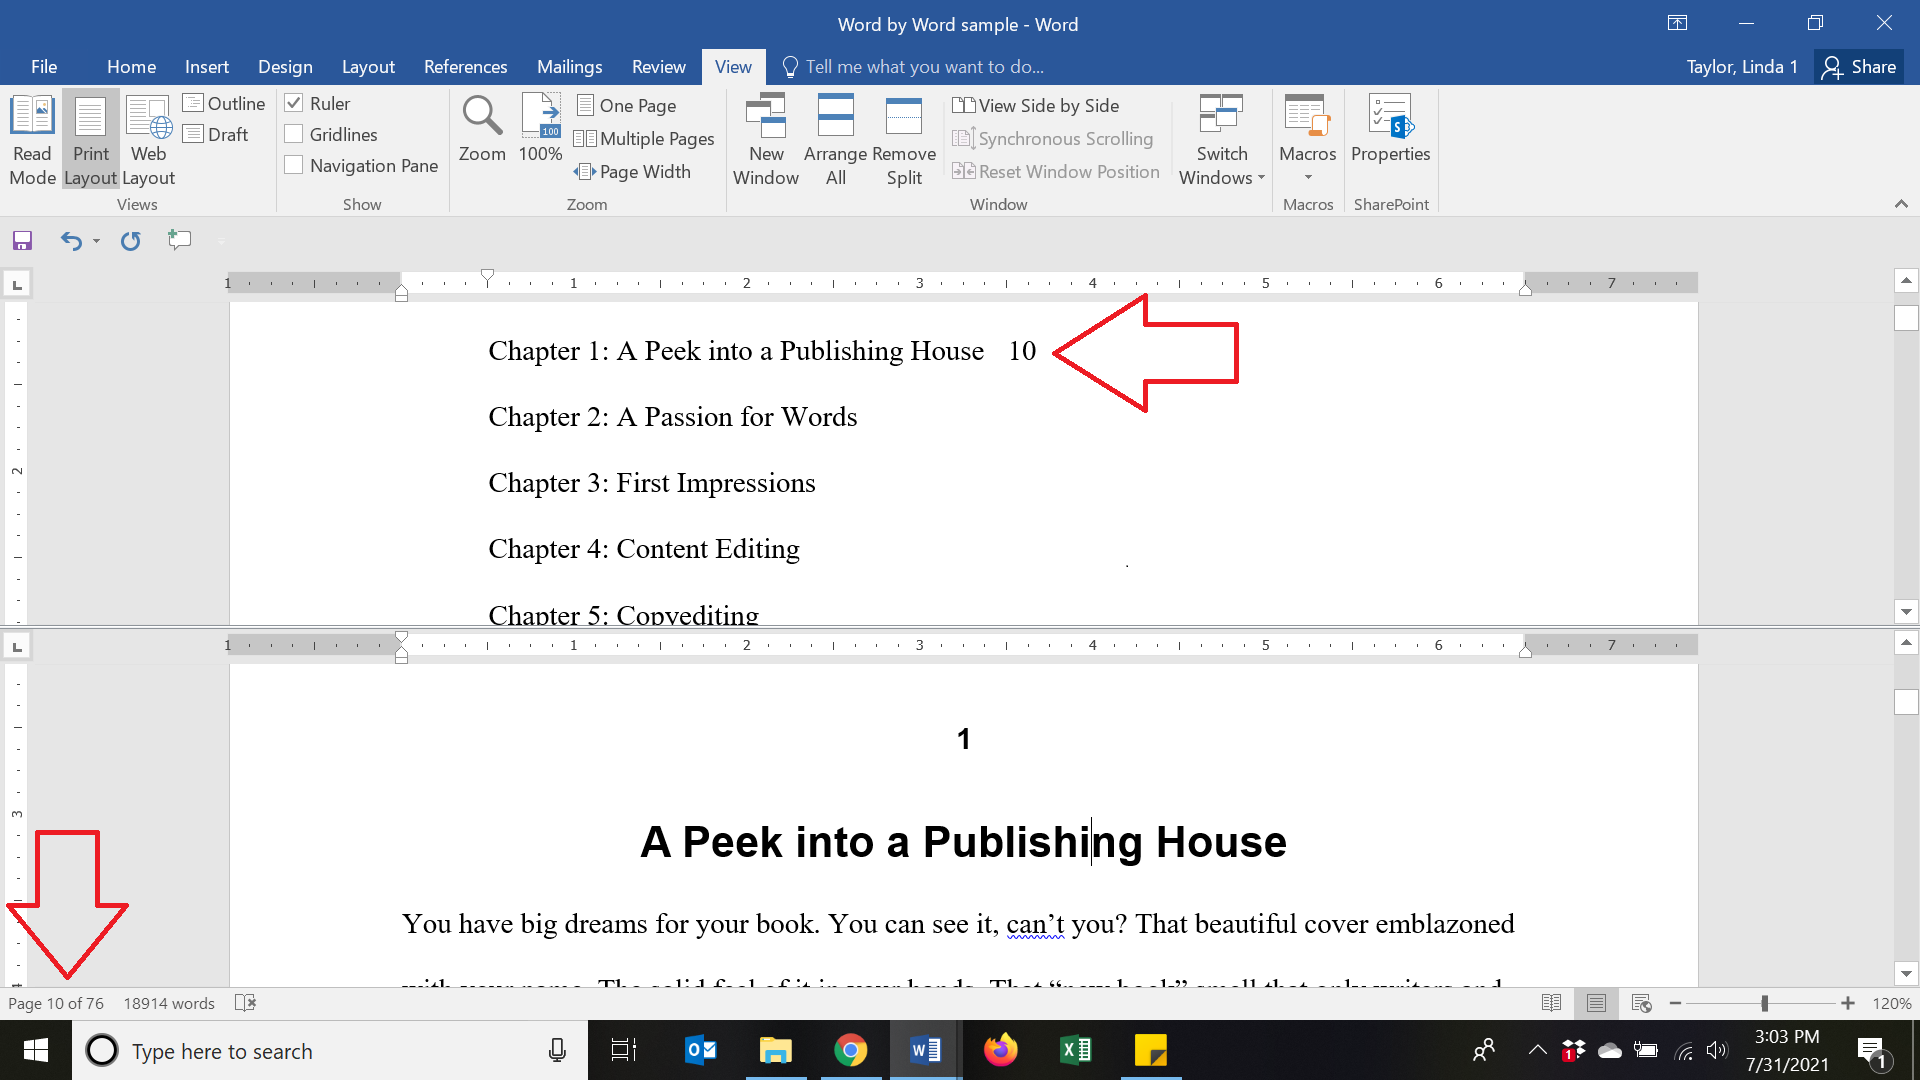
So keep the top window intact and viewing the TOC page, while you use the bottom window to scroll through the document. Scroll to the start of the first item that should go in your TOC (as I have below, Acknowledgements). Type the title into your TOC. Start the next line in the TOC, and drop to the bottom screen and continue to scroll until you have included all the front matter pieces and all the chapters. Also include any back matter pieces (such as an Index, Bibliography, etc.).
When you’re finished, hit that same button (which now says “Remove Split”), and the split will disappear.
You can include the page numbers from the manuscript in your TOC as you go, or you can include only the chapter titles. (Realize that page numbers really mean nothing because when the book is typeset, the page numbers will need to be readjusted to match the actual book pages.) But if you want your manuscript TOC to reflect the page numbers in the manuscript, just include the numbers from each page right after each TOC entry. Place your cursor in the bottom half of the screen, then read which page number you’re on by looking at the bottom left. This will tell you which page. In the photo below, the bottom half of the screen is page 10, so I put the number 10 in my TOC page beside that chapter name. (You have to be sure that your cursor is in that bottom half of the screen to give you the correct page number.)
There you have it! After your TOC is completed, do another page break before the next page (which would be the first entry in your TOC) and you’re good to go.
Watch next time for an understanding of the various other front matter pieces you can include and the differences among them. And watch for notification of the style tagging video, soon to come!
(This article, without visuals, originally appeared in The Christian Communicator magazine.)
As I noted in this previous post, the key must-haves in your manuscript include your title page, your copyright page, and your Table of Contents (standard in nonfiction; optional in fiction). That previous post covered creating your title page; now let’s talk about creating the copyright page.
If it doesn’t, navigate to the Insert tab, and on the far right of that ribbon is the Symbol button. Click on the down arrow. That will open a series of possible symbols. (you can actually see that the copyright symbol for me is right there on the second row. I could just click and it would insert).
If you don’t see the copyright symbol there, click on More Symbols. That will bring up another couple menus. Click on Special Characters, and then the copyright symbol.
After you have entered that symbol, put the current year and your name, like this:
One quick note: Don’t put this information on the cover or title page. It is understood in the industry that the very fact that you created this piece protects it with copyright. You need not worry about someone stealing your work if you don’t put a copyright symbol on the cover page (in fact, if you DO put it there, you’re going to look like an amateur—like you don’t really understand the industry. Don’t do that).
Instead, I’m having you create this copyright page for your manuscript because the publishing house will add it anyway, but you can add the material for the sources you used.
For example, on this copyright page you include the copyright lines of material from which you have (or obtained) permission to quote or use artwork or illustrations (this could be any number of sources depending on what you’re writing). Often, for Christian writers, this may include Bible versions. And while you don’t need to request permission to quote verses from Bibles, you still need to include the copyright lines of all the Bible versions you quote throughout the text.
As you wrote your document, you kept track of your source(s) for Bible verses—that is, what Bible version you were quoting from (you did, didn’t you?). Perhaps you just typed the verses from your well-worn Bible. Or maybe you quoted from several different Bible versions because you liked the nuances of the way various versions translate your key verses.
For the copyright lines for your copyright page, look at the copyright page in the Bible from which you’re quoting. For example, in my New Living Translation, it says: “When the Holy Bible, New Living Translation, is quoted, one of the following credit lines must appear on the copyright page or title page of the work.” Then follow three options. The first is used if all of the verses you quoted were from the New Living Translation. In this case, the NLT says to write the following on your copyright page:
If the NLT is your default and the only version you used, you would type the above exact line onto your copyright page.
Perhaps the NLT was the main one you used, but you sprinkled in a couple other versions, such as the King James Version. In that case, you do need to make sure that KJV is noted at that reference. “The Lord is my shepherd; I shall not want” (Psalm 23:1 KJV), and on your copyright page, you will choose this line from that NLT copyright page:
Unless otherwise indicated, all Scripture quotations are taken from . . . (etc.)
and then you’ll also include a copyright line from the KJV Bible.
Scripture quotations marked KJV are taken from the King James Version . . . (etc., with the copyright line from your Bible)
If you used a variety of versions, make sure that after every reference throughout your entire manuscript that you note the Bible version—for example: (Genesis 1:1 NIV) and (Romans 5:8 NLT) and (Philippians 1:5 KJV). Then, on the copyright page, you need to include the copyright lines as noted on the copyright page of each Bible.
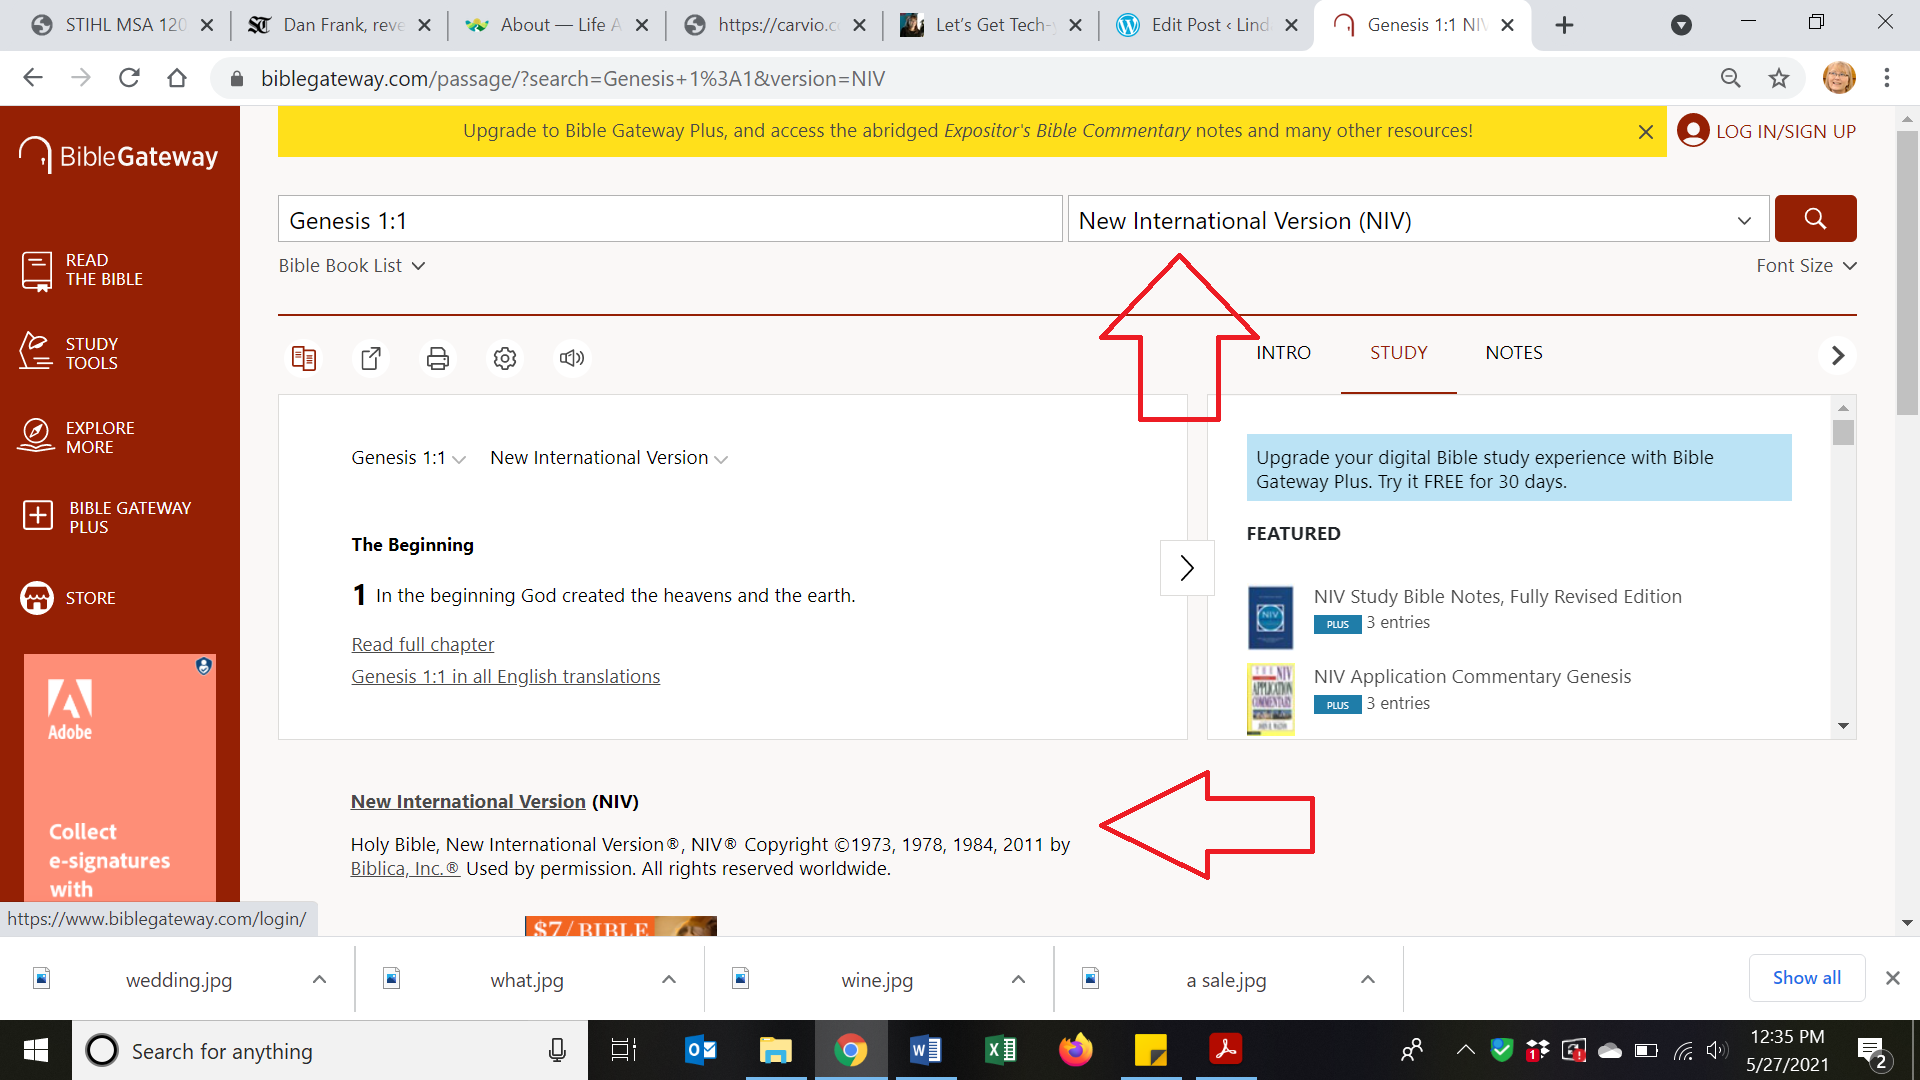
If you’re using a source such as Bible Gateway for your Bible verses, note that the copyright line for any version you choose is given to you, as here:
If you use other Bible software, look around for the copyright information on the Bible versions.
After you have put in the copyright material for Bible versions, also include some standard information such as this:
All rights reserved. This book or any portion thereof may not be reproduced or used in any manner whatsoever without the express written permission of the publisher except for the use of brief quotations in a book review.
This is for your manuscript submission. When your book is published, the publisher will take care of adding their boilerplate copyright page information, their Library of Congress information, the printing numbers, etc. You just need to provide these basics.
If you’re self-publishing, you need to include this page as part of your book. Here are a couple of article links to help you create a copyright page when self publishing. Here’s a how-to guide and another guide with helpful info.
Great work! Next we’ll talk about creating your TOC (Table of Contents).
(This article, without visuals, originally appeared in The Christian Communicator magazine, May-June 2018.)
Part of delivering a pristine manuscript is to make sure all the pieces are in place. This includes your book’s front and back matter. Whether you’re delivering your book to an editor or preparing to self-publish it, make sure all of the front and back matter (referring to material that comes before and after the text itself) is included and in the correct order.
In case you wondered, there is a certain order for all those pieces as determined by the Chicago Manual of Style. You generally won’t have all of these items in your front matter. The only two you must have are the title page and copyright page. A nonfiction book will generally also need a table of contents; you may or may not have that in a fiction book.
Front matter can include:
Title page (must have)
Copyright page (must have)
Dedication
Table of Contents (standard in nonfiction; optional in fiction)
Foreword
Preface
Acknowledgments (if not part of the Preface or in the back matter)
Introduction (if not part of the text)
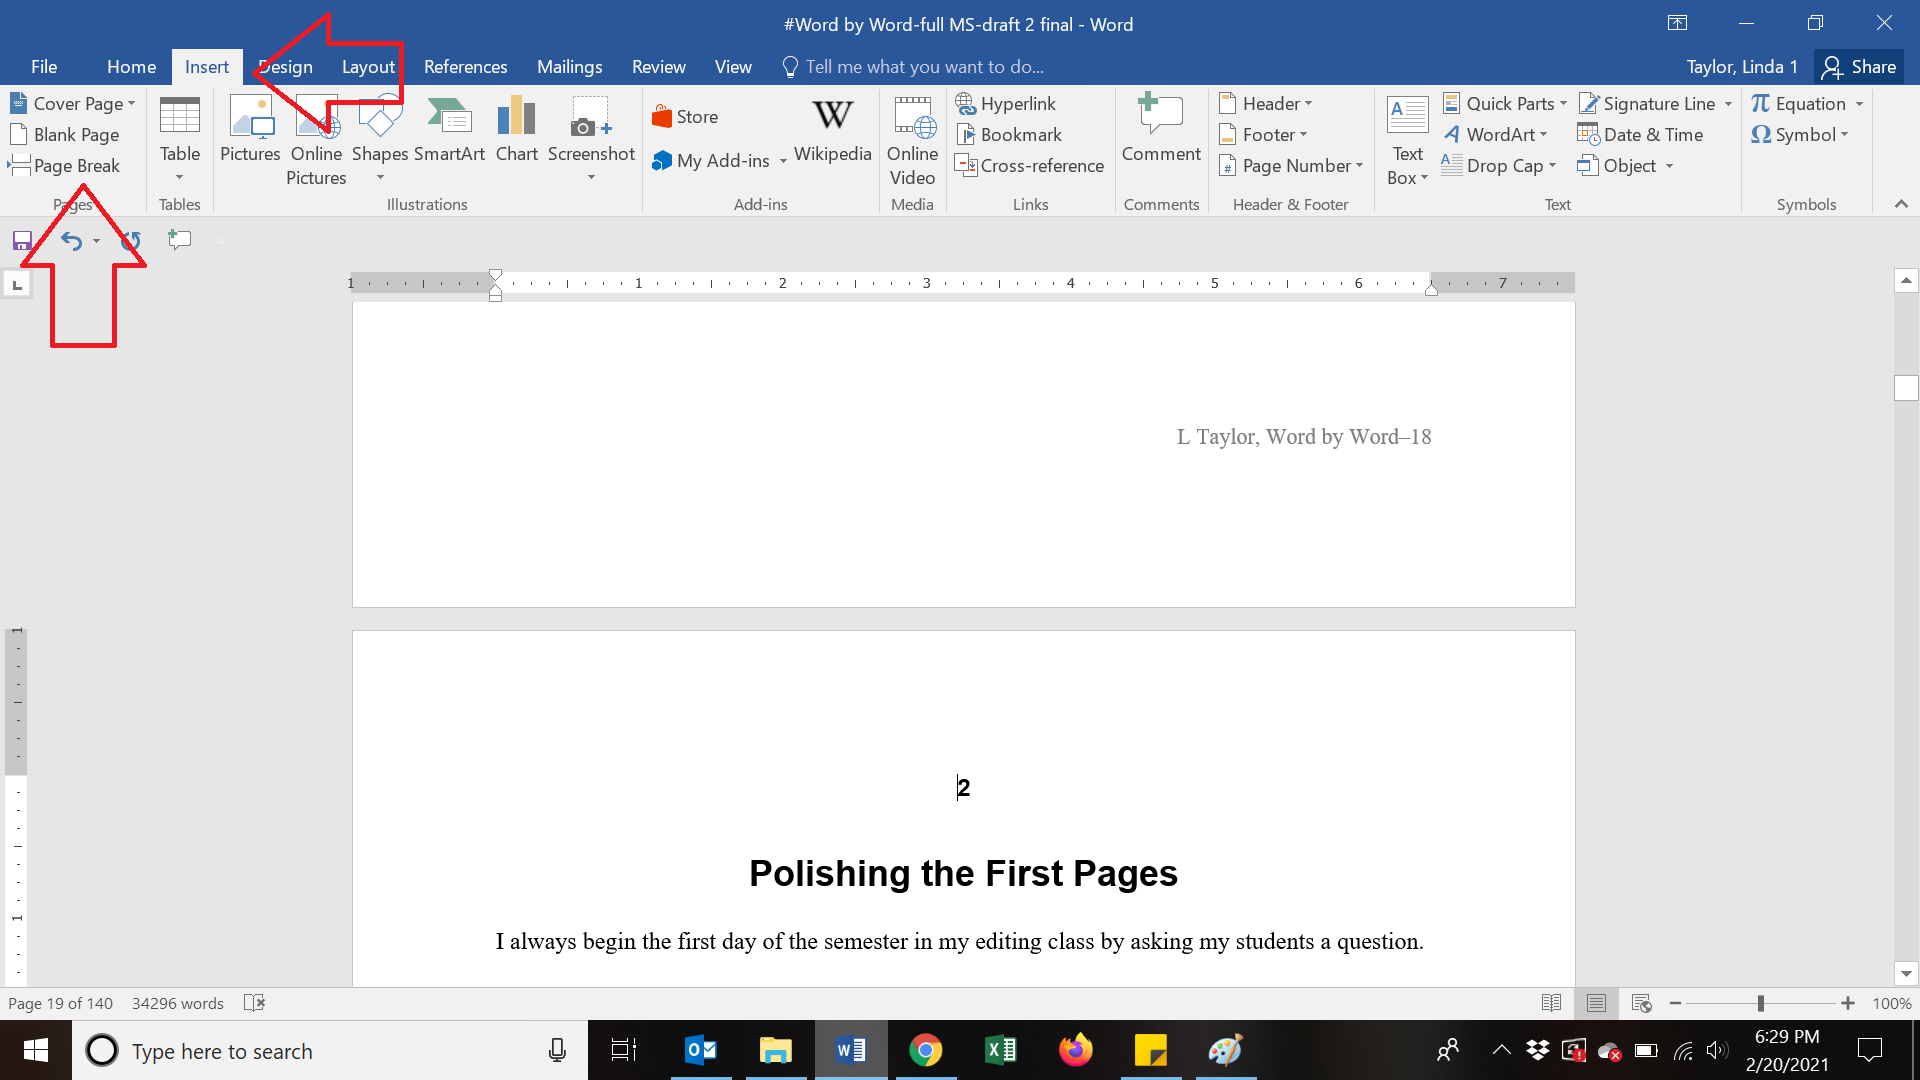
In this article I want focus on the first piece of the front matter—the title page.
Creating your title page
If you so desire, you can use one of the Cover Page options that Microsoft Word gives you. Click at the start of your manuscript, probably at your first chapter number or title (if you haven’t done any of the front matter yet–in any case, at the very top of your manuscript), and click Insert on the ribbon, then the dropdown arrow in the top far left corner that says Cover Page.
This will open up a window of several design options for the cover page of your manuscript. Scroll to see all of them. Keep in mind that some of these are created to be for academic papers or for other purposes. Don’t be overly fancy. And it’s best not to use one that has a lot of deep color (such as the full page of blue or black) because if your manuscript is being printed by various readers, using all that ink makes them annoyed. (Just sayin’.) When you click on one, that design of the cover page will be inserted. You can then add your title and name.
You can also just do this old school and very simply without using one of the templates. Go to the top of your manuscript and hit Insert and then Blank Page (the Blank Page option appears right below that Cover Page option in the visual above). You can then type in your title and your name by just visually centering the material vertically (go to your View tab and in the Zoom menu click on One Page so you can see the entire page). You can then do return-return-return to scoot the title down to be basically near the center of the page. (I know I told you not to do this between chapters in this earlier post, but since this is the title page and nothing will come before it, it’s okay.)
If your title and name are appearing flush left on your page, you want them to be centered, so use the centering button (Home ribbon, Paragraph menu) to center your lines horizontally. You can see there that you have buttons for flush left, centered, flush right, and justified (meaning straight edges both left and right). Highlight the words on this page, then click on the centering button to center everything horizontally. You can play with your returns to make sure all of the material looks good when you see it in single page view.
On the title page, include your title, subtitle, and your name (as you want them to appear). Do not type a copyright symbol with your name on the cover page; it is not necessary to “protect yourself,” and you’ll look amateurish if you include it.
If you are submitting to an agent or a publisher, look carefully at their submission guidelines. They may ask that you also include your address and other contact information on the title page as well. Be sure to follow whatever guidelines they give you.
Next time, we’ll talk about other pieces of the front matter.
(This article, without visuals, originally appeared in The Christian Communicator magazine, May-June 2018.)
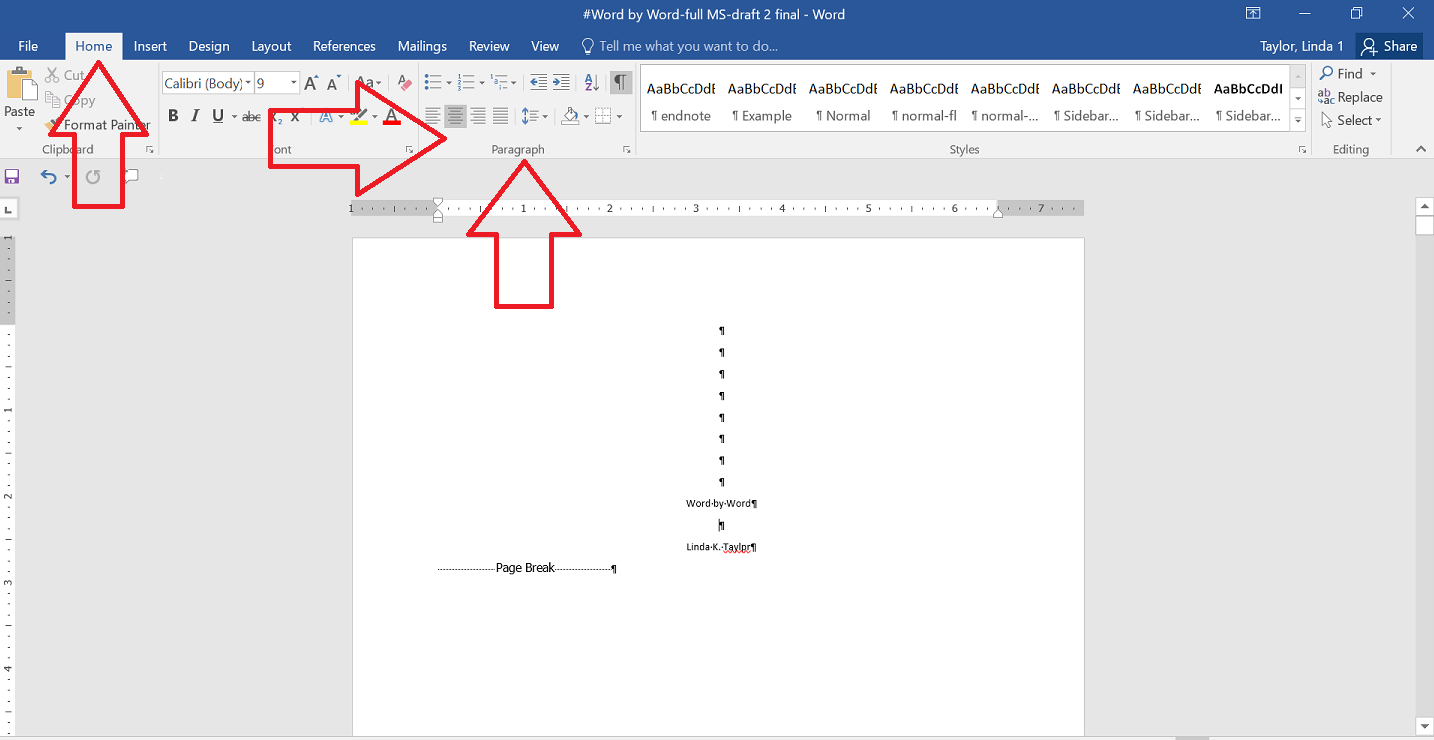
The next piece from our bulleted list of creating solid manuscript submissions (see the post here) to send to publishers is to put a page break between chapters (and everywhere that you need to start a new page). Fortunately, Microsoft Word makes this easy.
First of all, here’s what not to do. DON’T get to the end of your page or chapter and then do return-return-return-return-return (etc.) until you get to a new page. If you turn on the Show/Hide button, it will look like this. And if you would continue to do those returns until that chapter 2 finally jumps to the next page, then you’re doing it wrong. (Sorry not sorry.)
A key problem is that those returns will stay in place and, if you continue to edit the section above, those returns will then end up wreaking havoc on the rest of your manuscript. Instead, let’s do it the easy way, creating a page break that stays in place, no matter how much material you add or remove above it.
Position your cursor in front of the words that should be moved to a new page (in the case of my example, at the numeral 2). You can do one of two things:
You can simply push Ctrl + Enter and that will insert a page break.
OR you can go to the Insert tab and then click on the Page Break button.
Now you have a nice clean break between chapters. To see what this actually looks like, turn on the Show/Hide button again (on the Home tab), then go to the View tab and click on Draft. (You may or may not see that column that I have to the left. That’s a discussion for another day.) Most likely you’ll have just the main page where you’re typing, and you’ll see that there are none of those returns showing up; instead, you can see the clearly marked Page Break.
Now, if you were to go back and remove or add material from above the break, the break will stay in place, always separating that next chapter.
Do this between every chapter and every time that you need to start a new page in your manuscript.
If you need to remove a page break, just position your cursor at the break and push Delete.
Stay tuned next time when we’ll use the Page Break command and get our front matter created!
Do them once, and they will appear on every page. The magic of Microsoft Word makes it fairly simple to add page numbers — but there’s always something that could be confusing.
Last week you created a template. Open that template and give it a title. Push “Save As” and then decide where on your computer you want to save it and the name of the piece you’re writing. OR simply open your work in progress (WIP) that doesn’t have page numbers on it.
Now, let’s insert page numbers.
(1) Navigate to the Insert tab. Look across to the Header & Footer box.
(2) Click the dropdown arrow beside “Page Number.”
(3) At the first dropdown box, you can choose the placement of the page number. You can click where you want the page number to be—top or bottom of the page. For our purposes, choose Top of Page. That then will open up another menu that will allow you to choose where at the top of the page you want the number to appear — top left, top center, top right. Again, for our purposes, click on the top right choice. (There are dozens of other options you’re welcome to play with; for now, I’m sticking with the basics.)
(4) Voila! Once you click it, a header will appear on every page with a page number.
Perhaps you want to include more information in the header besides just the page number.
(1) Click into the header area with your cursor beside the page number. Now you can simply type in other information such as your name or the title, which will then appear on every subsequent page. When you are working with numbers that are flush right, as here, put your cursor beside the number and type. The letters will work their way to the left.
Note: Follow submission guidelines for where you submit. Various publishers ask for various renderings of page numbers and what information they want in headers or footers. They usually have submission guidelines on their websites. If you’re not sure, at least include your last name and page numbers in the headers or footers on your manuscript.
Now to answer some reader questions:
I tried to format page numbers with my name/book title/page number at the top right. Each time the page number got bumped to the line below my name/book title. And then the title page ended up with a 0 on it, not what I wanted at all.
How to fix page numbers moving down to a separate line
Let’s deal with the first question about why the page number got bumped. I think it has to do with a tab setting. Click into your header. If you see a tab setting right there in the center, grab it and slide it off to your left (or right depending on where you’re putting your page numbers). You should then have the space across the entire header. My guess is that your name/book title/page number is quite long. It was going past that tab, and thus bumping the page number to the next line. If that doesn’t answer your question about that, let me know.
How to remove a page number from the title page
Now let’s deal with the title page having a 0 on it. If your document has a title page, you don’t want a number on it at all, and page number 1 should actually be your second page. So we want to do something different with the first page. This gets a little complex, so bear with me.
(1) First, you’re going to need to make a section break (not just a page break) between the title page and the first page of your manuscript. If you already have a page break there, remove it so that your copy runs right below your title.
See below that I have run chapter 1 into my title page. Now I need to separate the title page from my chapter 1 with a different kind of break. With my cursor set right before the word “Chapter,” I then click on the Layout tab, then Breaks. Under Section Breaks, click Next Page.
My title page is now on its own page with Chapter 1 starting on a new page. But the header is still appearing on my title page along with the page number 1, so here’s what to do:
(2) Now make sure you click with your cursor into the header section on the title page (or footer if that’s where your page numbers are). Then click on the Design tab and put a click in the box labeled Different First Page. (Note that Show Document Text is already clicked; leave it as is.)
The header on your first page will disappear, but page 2 still says page 2. Let’s fix that so it will be page 1.
(3) Click with your cursor into the header area on page 2. Then go to the Insert tab, back over to Page Numbers, then click Format Page Numbers. It will give you another dialog box.
In the Page Number Format dialog box, you’ll see a section called Page numbering, and then a bullet that says Start at. Click that bullet and put a number 1 in the box, then say okay.
The header on page 2 should now read page 1, and there should be no longer a header on your title page.
Your document may have a lot more complexity, and this is simply a way to set page numbers and separate out a title page.
As always, let me know if you have questions and I’ll research the answers. More to come!
I write on this blog often about the joys and pains of writing–of just getting those words on the pages. I also write often about editing those words (in fact, I wrote a book about it). I also teach it in the Professional Writing major at Taylor University.
But there comes a time when all writers have to understand that those carefully wrought words need to show up in a well-formatted manuscript, set to industry standards. And this is where things can become very frustrating.
So I’m here to show you how, along with a little help from other editor friends. I’m going to begin a series of posts to help you deal with some of those technical parts of prepping your manuscript–one step at a time.
Longtime author and editor Andy Scheer (andyscheer.com) one day posted on Facebook how thrilled he was to receive a correctly formatted manuscript. I dropped him a note to ask, from his perspective, what constituted a manuscript that is “formatted correctly.” Here’s the list he sent me. The manuscript should be:
Manuscript is .doc or .docx
12-pt Times New Roman
Double-spaced copy
No extra space between paragraphs
1-inch margins
Paragraphs indented—but NOT with tabs or spacing
No double spaces between sentences
Page headers with page numbers
Page break between chapters
Front matter completed (title page, copyright page, table of contents if needed)
Copyright page includes copyright info for all Bible versions quoted, especially the default Bible translation
In coming weeks, I’m going to walk through each of these bullet points individually. I’ll help out with the basics and offer some technical tips, screen shots, and more. BUT FIRST, we can deal with several of those issues by creating a template that you use as your base for every piece of writing you plan to submit. So let’s start there. (Note that the following uses a PC; if you have a Mac, stay tuned. I’ll work to get the information you need as we go.)
How to Build Your Template
Having a template that has all of the settings you need already embedded will be a huge help to you. (Just FYI that this is technically simply a blank Word document, but it will have embedded in it all of the settings you need to create a perfectly formatted document and save you trying to redo it every time.)
The following the instructions will walk you through the steps in Microsoft Word. Doing that, you will create a template that will give you the first 6 bullets above: the .doc or .docx extension, 12-pt Times New Roman, double-spaced copy with no extra space between paragraphs, no extra space between paragraphs, 1-inch margins, and indents not with tabs or all those spaces.
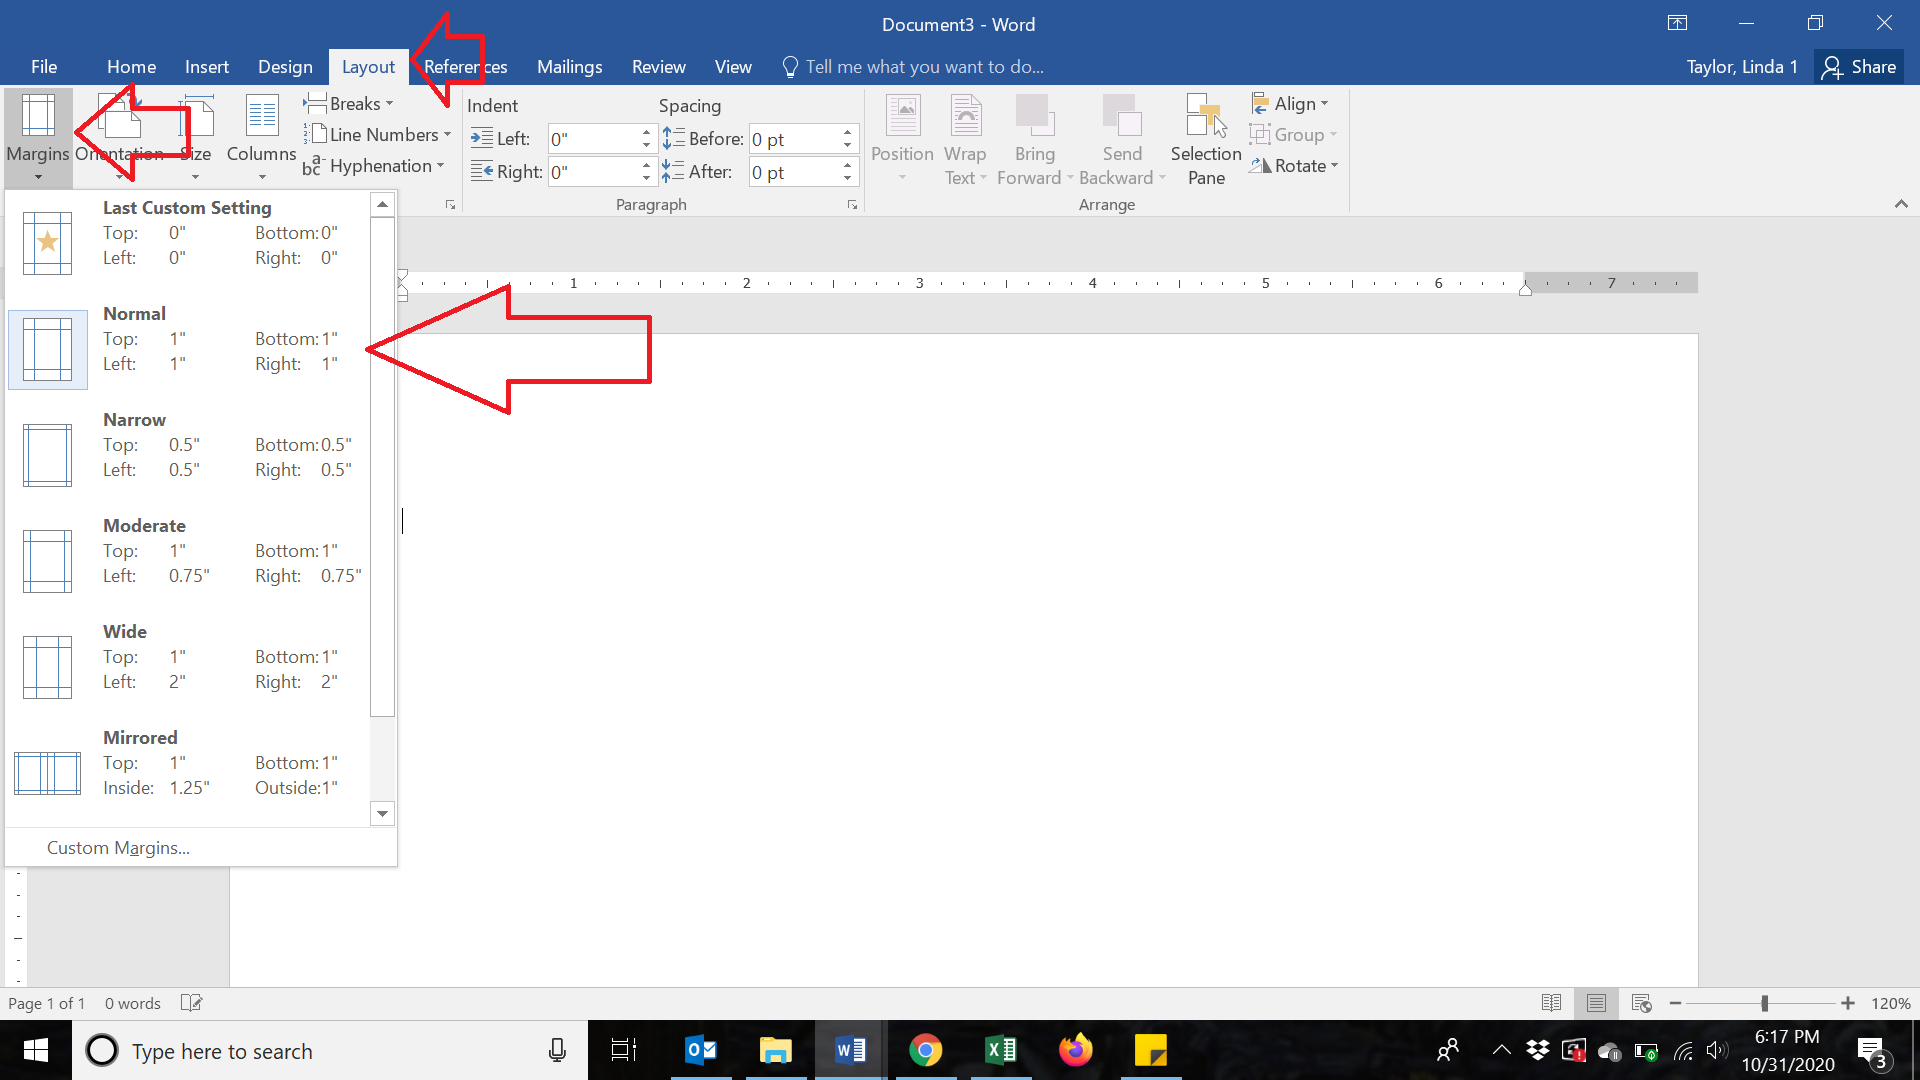
(1) Open a new blank Word document. (2) It most likely defaults to one-inch margins, but to check, click on the “Layout” button to give you that ribbon. On the far left is a button called “Margins.” Click it. You should see a “Normal” setting that defaults to all one-inch margins. If that is not clicked, click it.
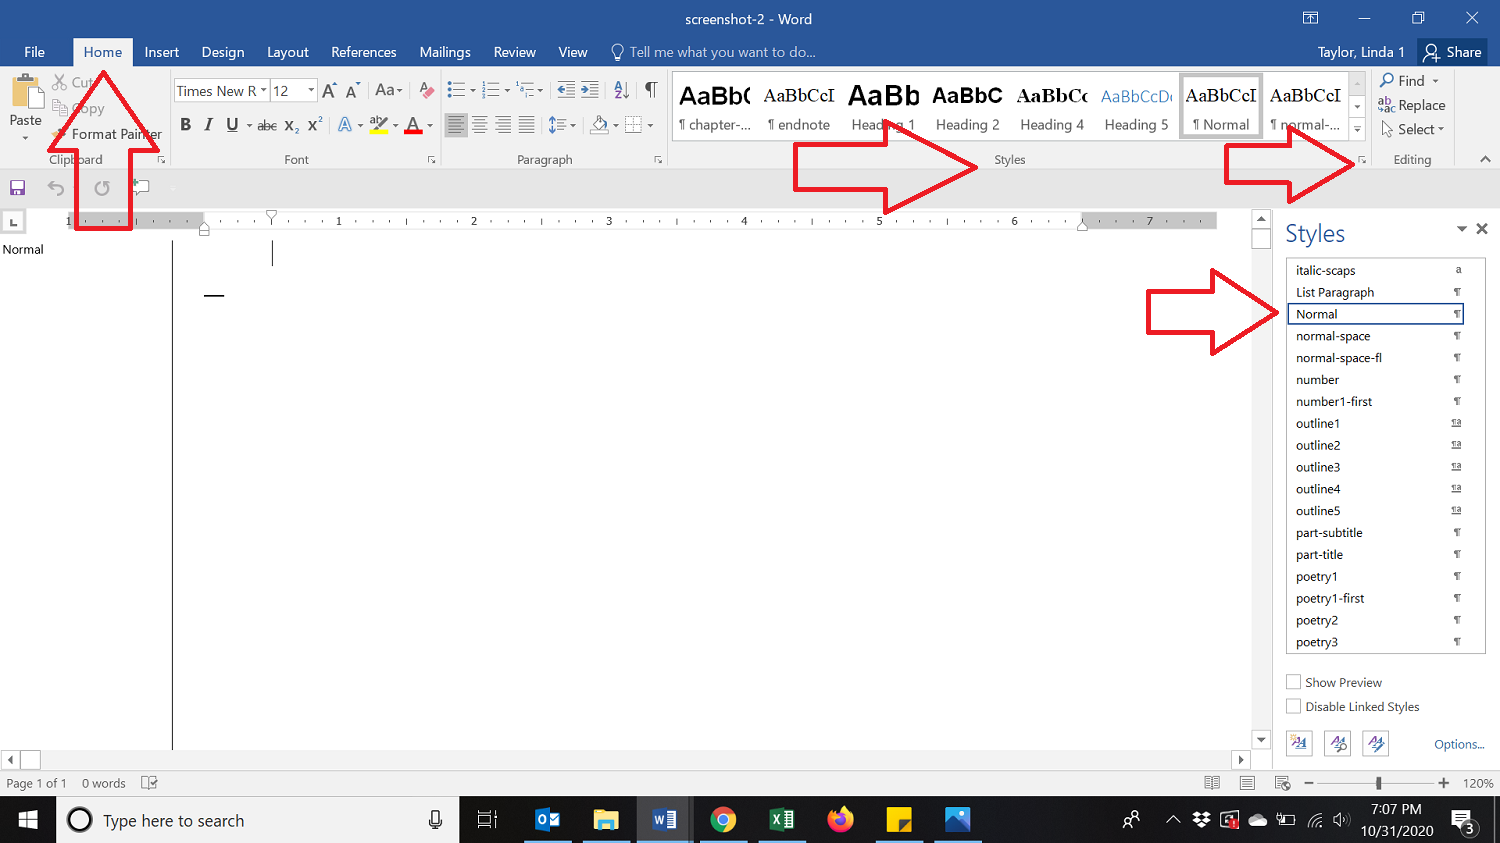
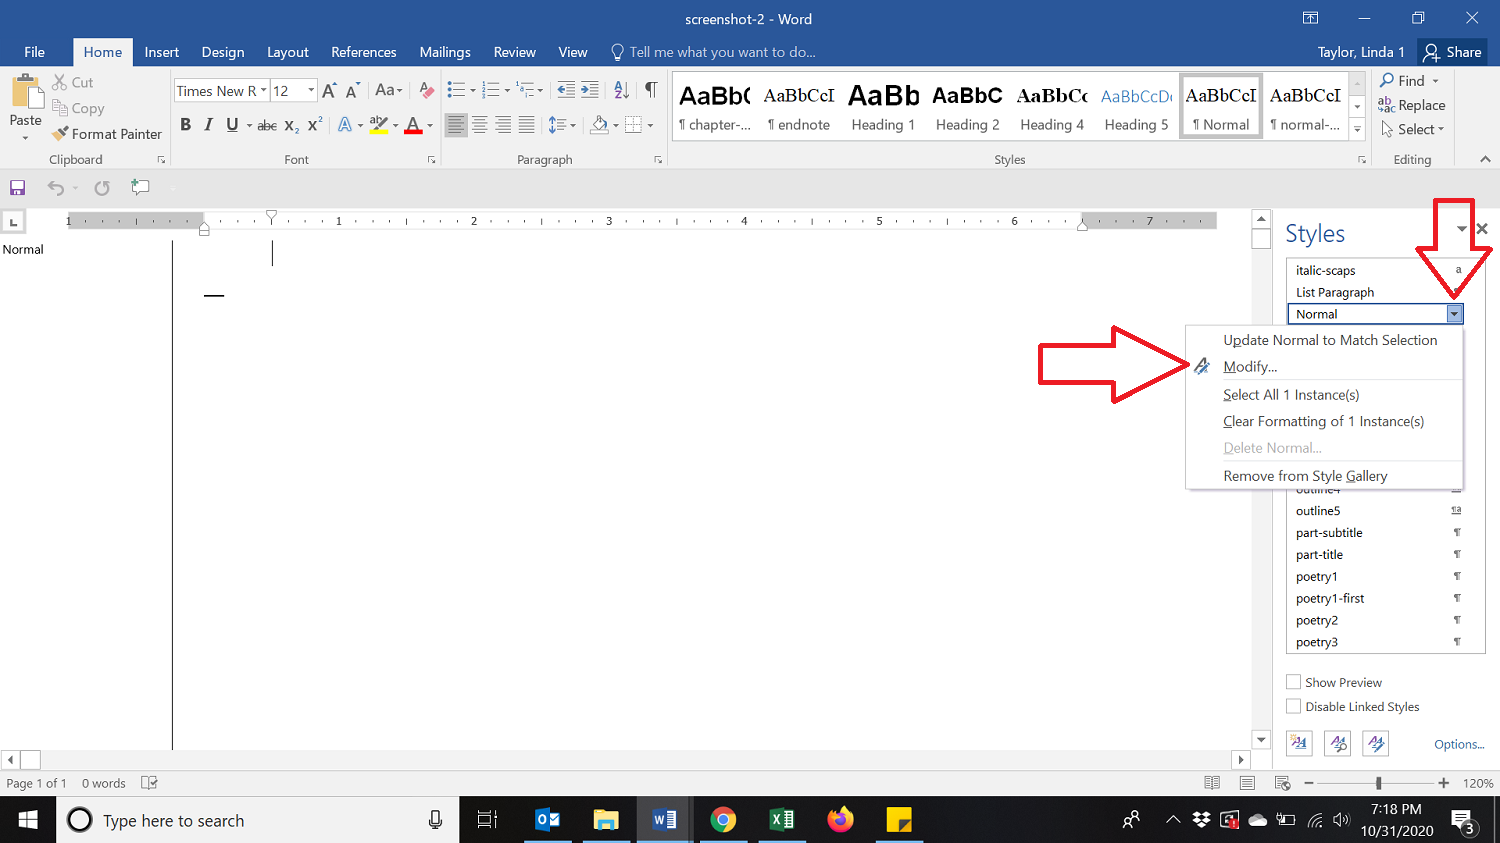
(3) Now go back to the Home tab to give you that ribbon. Above the “Styles,” box, you’ll see a series of styles that are common to this document. You’ll probably see Normal and some various heading styles. Most everything you type will default to the style called “Normal,” so let’s make sure that “Normal” is the normal that we want for our template. Click on the little down arrow at the bottom right of the Styles box that will drop down a menu of styles (your menu may look different from mine, but you should be able to find Normal).
Locate Normal, click on the down arrow to its right, then click Modify.
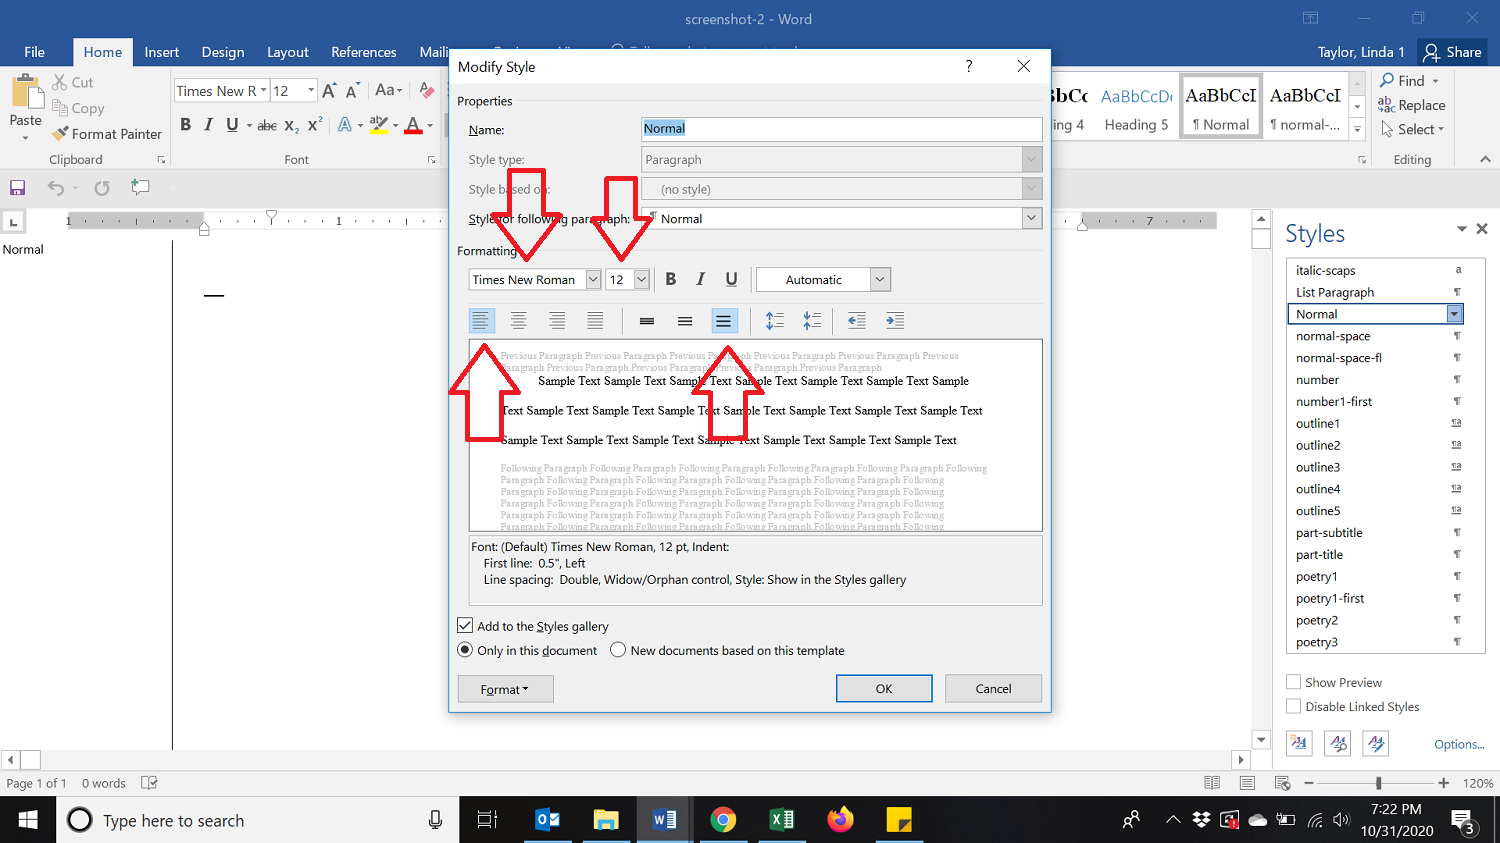
This will open a dialog box with lots of options. (4) About halfway down on the left, you’ll see “Formatting.” Make sure that the first box says Times New Roman and the second box says 12. If they don’t, click on the dropdown arrow and choose those options.
(5) Next, below that, you’ll see buttons with lines in them. The first set on the left is giving you the options to have your copy flush left and ragged right, centered, flush right, or justified (straight on both sides). You want to choose the first button for flush left and ragged right. (6) The next three buttons show lines really close (single spacing), sort of close (1.5 spacing), and far apart (double spacing). You want to click on the third button for double spacing.
Wait, you’re not done yet! Let’s deal with the other issues:
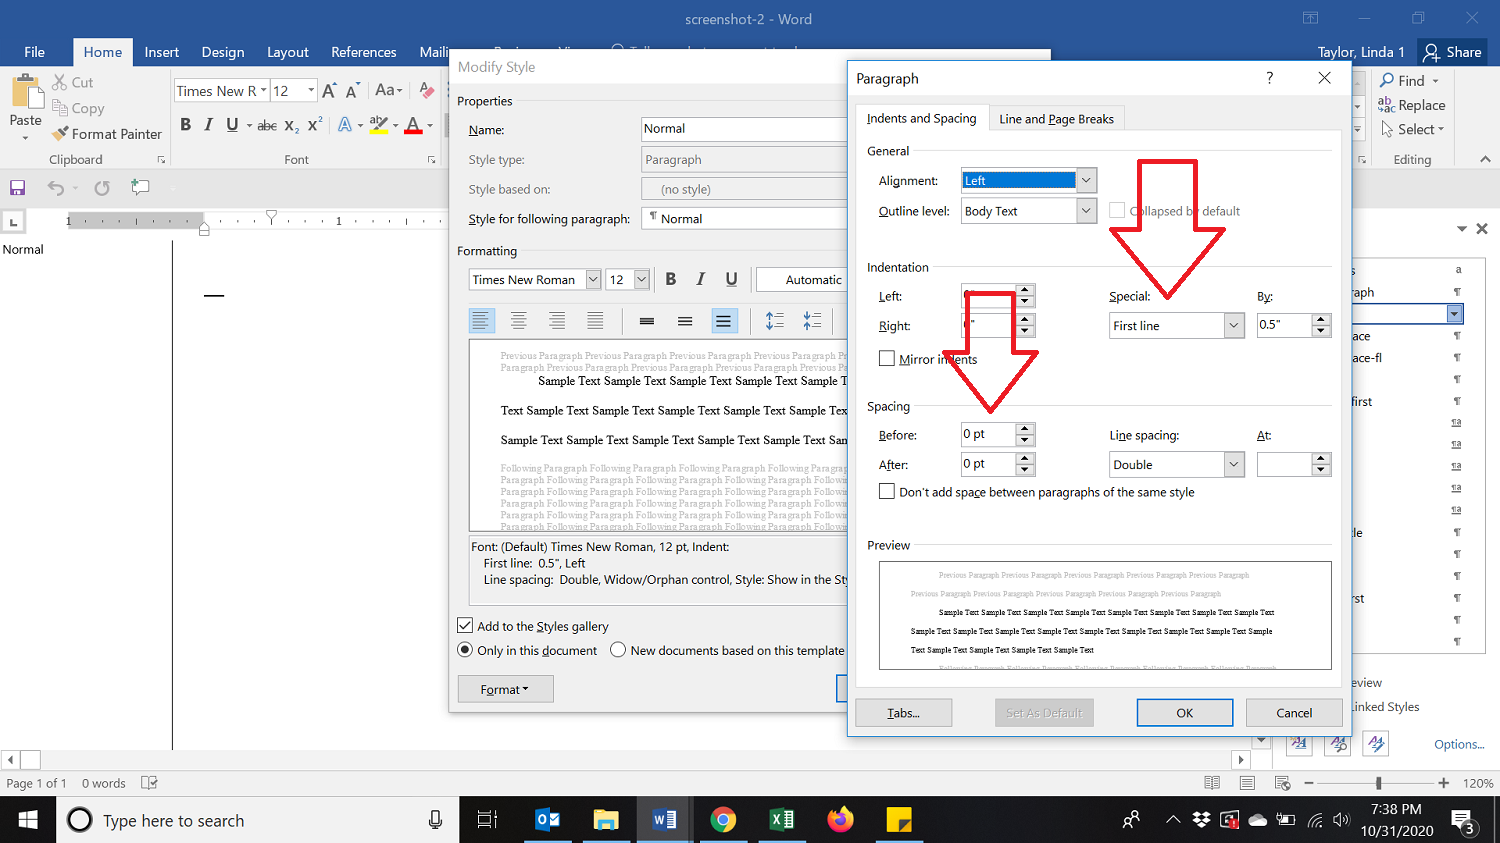
(7) In that same box, bottom left is a button that says “Format.” Push it, and then click on “Paragraph.” Yet another dialog box pops up!
(8) In this box, halfway down on the right side, you’ll see the word “Special.” In the box should be the words “First line.” If not (it probably says “None”), click on the dropdown arrow and choose “First line.” In the box beside that, you can set how far the indent should be. It’s probably best to put .5 there. This will automatically indent your new paragraphs so you don’t have to add a tab each time. (9) Keep going, there are a few more boxes on the left below that under “Spacing” with “Before” and “After” choices. Make sure that those read 0. (The default often has 10 in the After slot, which is creating extra space between the paragraphs. You want it to say 0—so change it. And don’t use “Auto.”) (10) Since you already set this to double spacing on the previous menu, you should see the word “Double” under “Line Spacing.” (11) Now click OK. This will take you back to that previous dialog box. Do one more thing here to seal the deal and help you not have to do this again:
(12) At the very bottom, right above that format button, are a couple of choices. Put a dot in the circle that says “New documents based on this template.” Now click OK. (13) This will take you back to your blank document. Now do a “Save As” and save this document as your own personal template for doing all of your writing. Calling it “Mytemplate” should work. Store it on your desktop and you’ll always have a template ready to go when inspiration strikes. So now you have:
Manuscript is .doc or .docx
12-pt Times New Roman
Double-spaced copy
No extra space between paragraphs
1-inch margins
Paragraphs indented—but NOT with tabs or spacing
Every time you start a new book or a new story, open this template, do another “Save As” to save that piece of writing with whatever title you want to give it. That way you’ll always preserve the settings you created in your template and won’t have to redo them every time for every piece of writing.
We’ll continue our tech-y talks in coming weeks to help make sure you’re submitting your documents the way the publishers want them.
If you have some other tech-y questions, write them below and I’ll see what I can help you with in future posts.