I write on this blog often about the joys and pains of writing–of just getting those words on the pages. I also write often about editing those words (in fact, I wrote a book about it). I also teach it in the Professional Writing major at Taylor University.
But there comes a time when all writers have to understand that those carefully wrought words need to show up in a well-formatted manuscript, set to industry standards. And this is where things can become very frustrating.
So I’m here to show you how, along with a little help from other editor friends. I’m going to begin a series of posts to help you deal with some of those technical parts of prepping your manuscript–one step at a time.
Longtime author and editor Andy Scheer (andyscheer.com) one day posted on Facebook how thrilled he was to receive a correctly formatted manuscript. I dropped him a note to ask, from his perspective, what constituted a manuscript that is “formatted correctly.” Here’s the list he sent me. The manuscript should be:
- Manuscript is .doc or .docx
- 12-pt Times New Roman
- Double-spaced copy
- No extra space between paragraphs
- 1-inch margins
- Paragraphs indented—but NOT with tabs or spacing
- No double spaces between sentences
- Page headers with page numbers
- Page break between chapters
- Front matter completed (title page, copyright page, table of contents if needed)
- Copyright page includes copyright info for all Bible versions quoted, especially the default Bible translation
In coming weeks, I’m going to walk through each of these bullet points individually. I’ll help out with the basics and offer some technical tips, screen shots, and more. BUT FIRST, we can deal with several of those issues by creating a template that you use as your base for every piece of writing you plan to submit. So let’s start there. (Note that the following uses a PC; if you have a Mac, stay tuned. I’ll work to get the information you need as we go.)
How to Build Your Template
Having a template that has all of the settings you need already embedded will be a huge help to you. (Just FYI that this is technically simply a blank Word document, but it will have embedded in it all of the settings you need to create a perfectly formatted document and save you trying to redo it every time.)
The following the instructions will walk you through the steps in Microsoft Word. Doing that, you will create a template that will give you the first 6 bullets above: the .doc or .docx extension, 12-pt Times New Roman, double-spaced copy with no extra space between paragraphs, no extra space between paragraphs, 1-inch margins, and indents not with tabs or all those spaces.
(1) Open a new blank Word document.
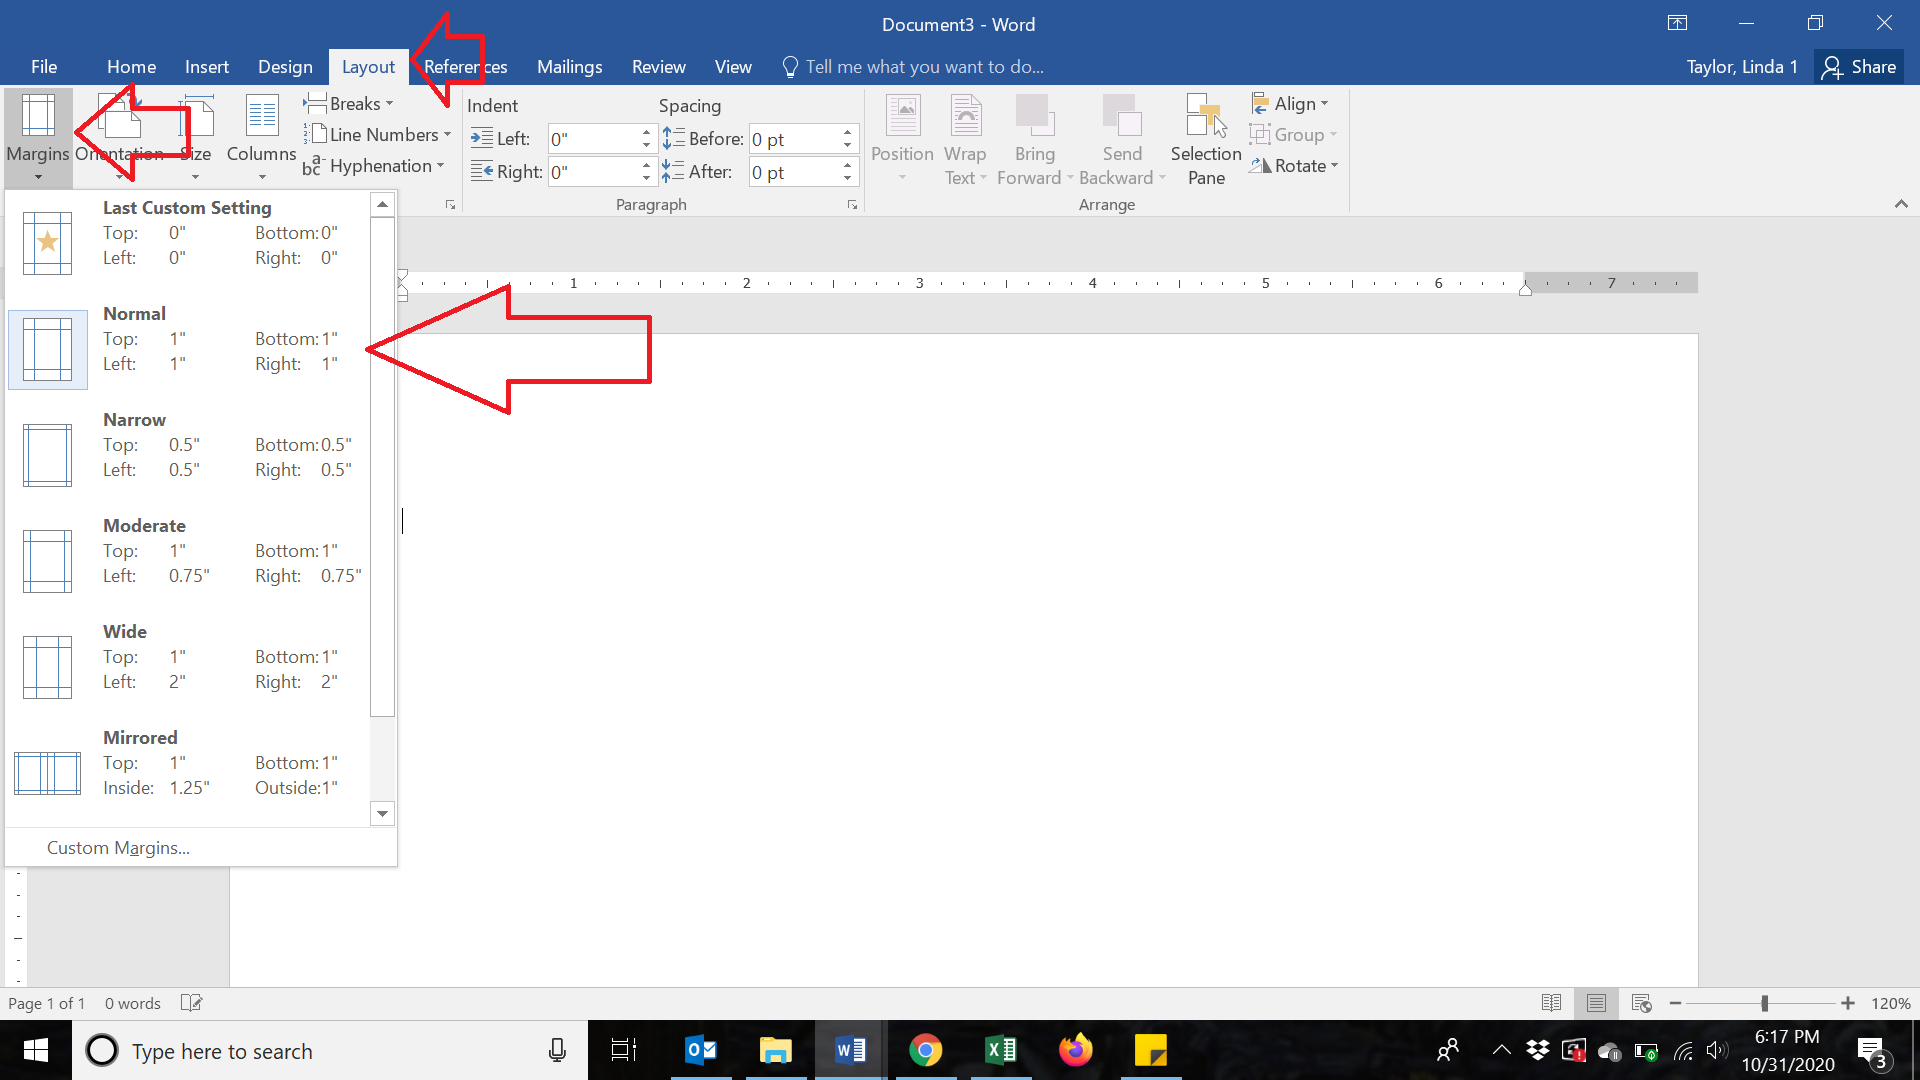
(2) It most likely defaults to one-inch margins, but to check, click on the “Layout” button to give you that ribbon. On the far left is a button called “Margins.” Click it. You should see a “Normal” setting that defaults to all one-inch margins. If that is not clicked, click it.
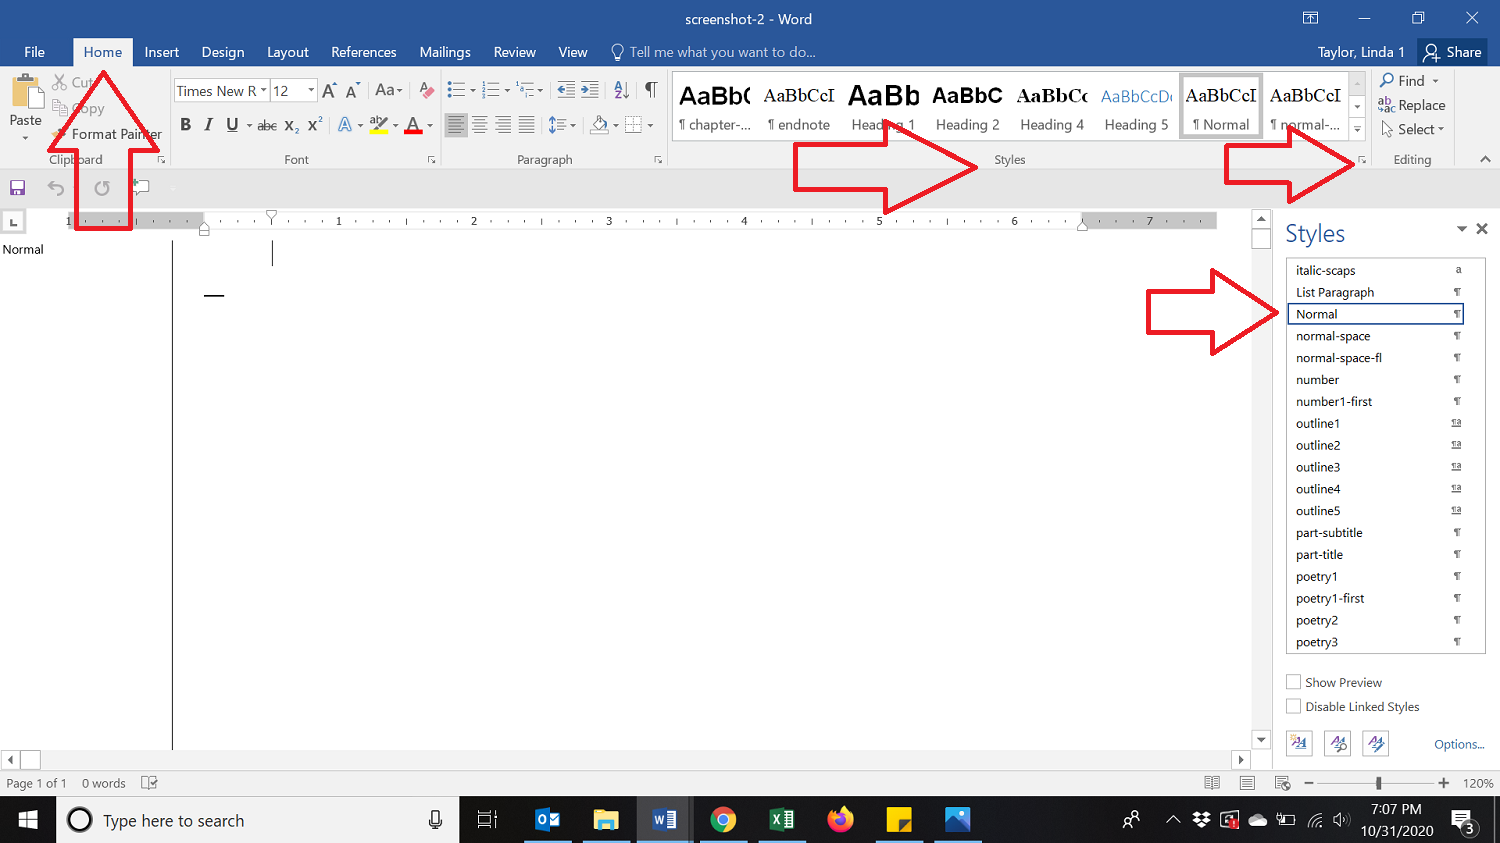
(3) Now go back to the Home tab to give you that ribbon. Above the “Styles,” box, you’ll see a series of styles that are common to this document. You’ll probably see Normal and some various heading styles. Most everything you type will default to the style called “Normal,” so let’s make sure that “Normal” is the normal that we want for our template. Click on the little down arrow at the bottom right of the Styles box that will drop down a menu of styles (your menu may look different from mine, but you should be able to find Normal).
Locate Normal, click on the down arrow to its right, then click Modify.
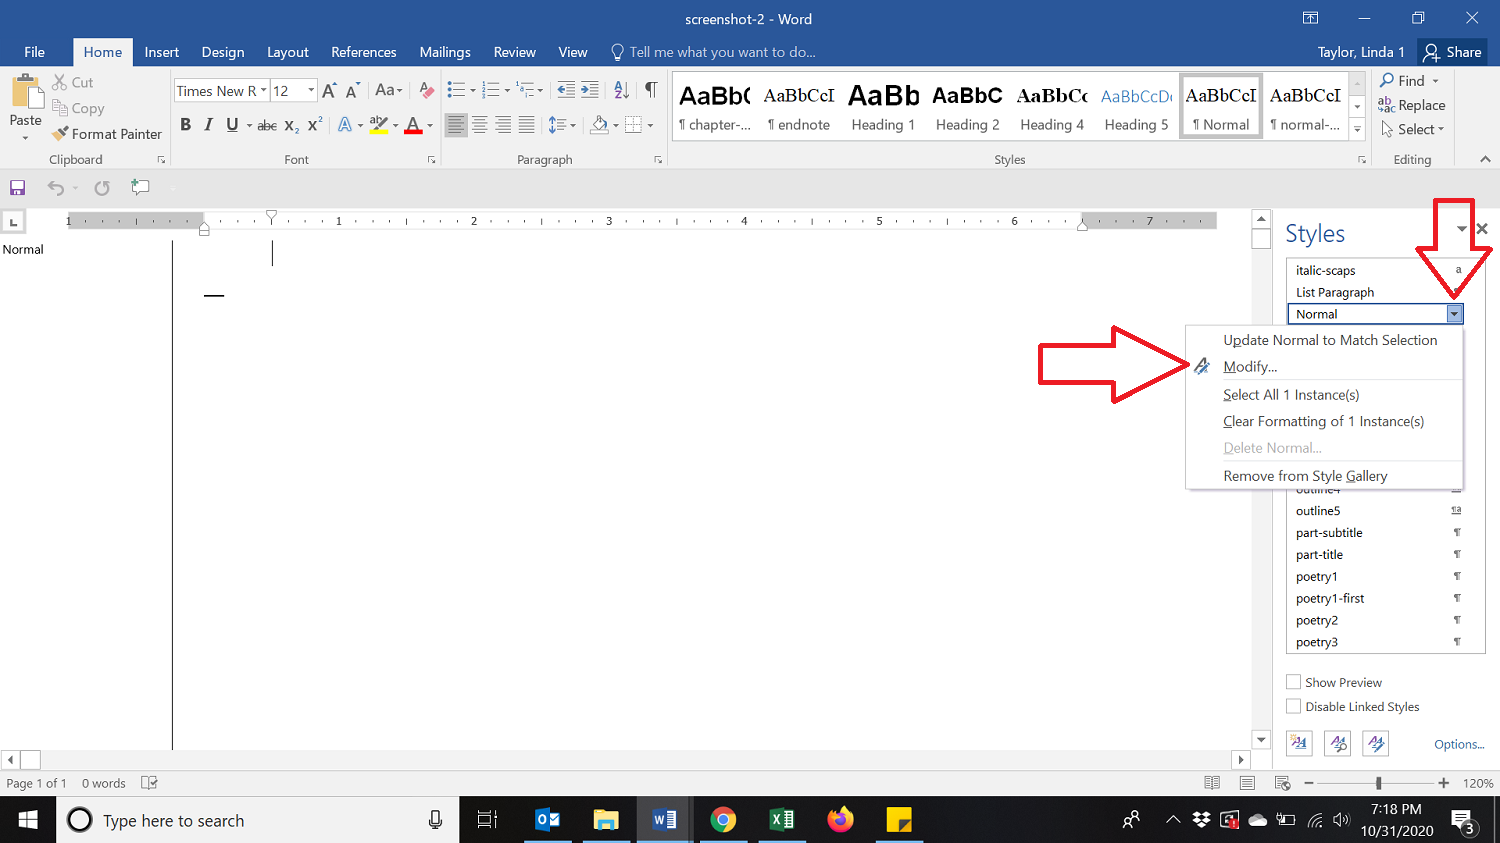
This will open a dialog box with lots of options.
(4) About halfway down on the left, you’ll see “Formatting.” Make sure that the first box says Times New Roman and the second box says 12. If they don’t, click on the dropdown arrow and choose those options.
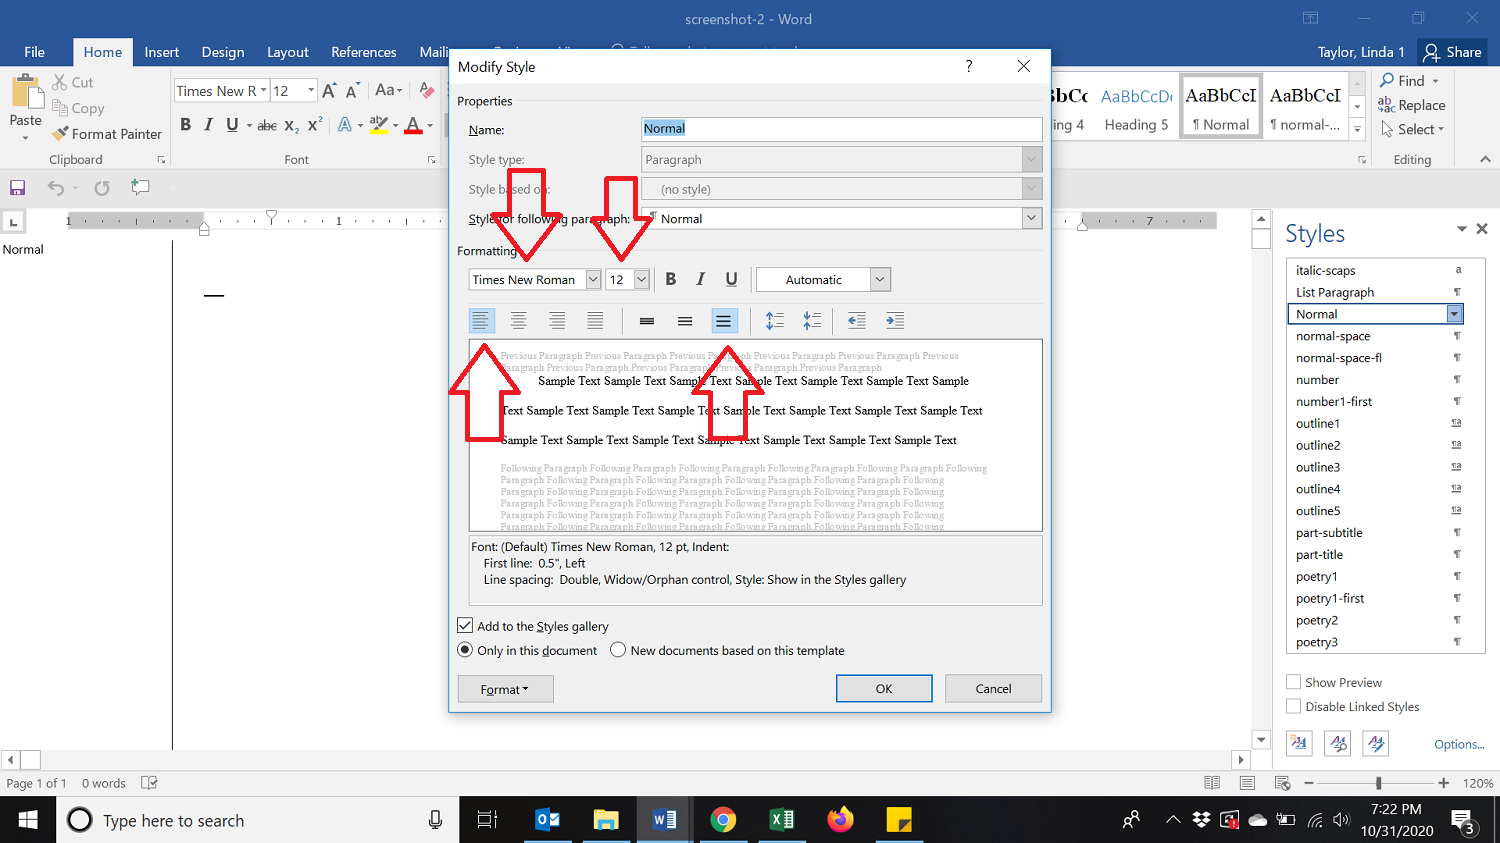
(5) Next, below that, you’ll see buttons with lines in them. The first set on the left is giving you the options to have your copy flush left and ragged right, centered, flush right, or justified (straight on both sides). You want to choose the first button for flush left and ragged right.
(6) The next three buttons show lines really close (single spacing), sort of close (1.5 spacing), and far apart (double spacing). You want to click on the third button for double spacing.
Wait, you’re not done yet! Let’s deal with the other issues:
(7) In that same box, bottom left is a button that says “Format.” Push it, and then click on “Paragraph.” Yet another dialog box pops up!

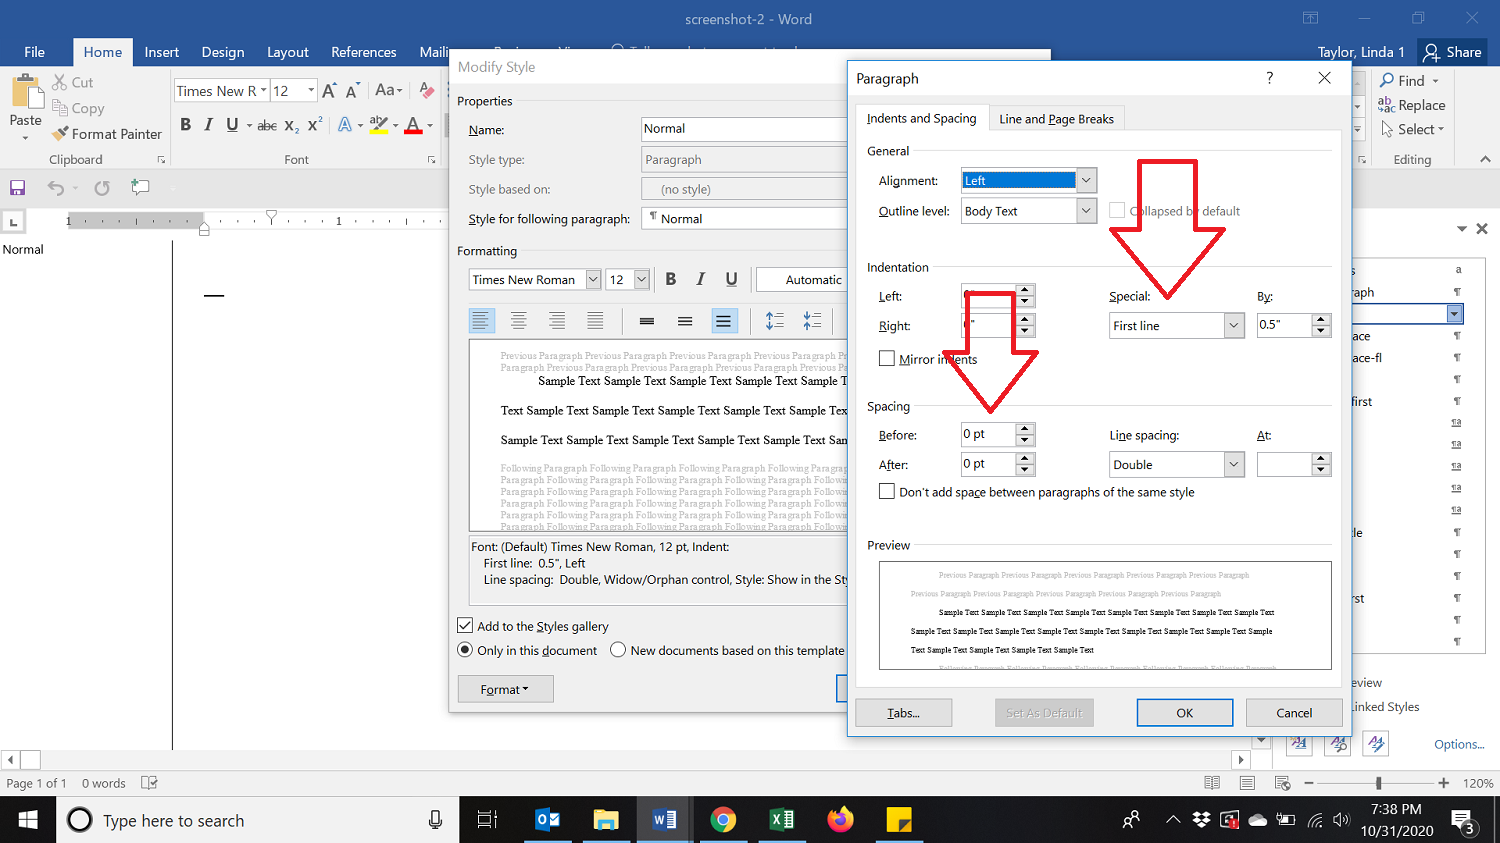
(8) In this box, halfway down on the right side, you’ll see the word “Special.” In the box should be the words “First line.” If not (it probably says “None”), click on the dropdown arrow and choose “First line.” In the box beside that, you can set how far the indent should be. It’s probably best to put .5 there. This will automatically indent your new paragraphs so you don’t have to add a tab each time.
(9) Keep going, there are a few more boxes on the left below that under “Spacing” with “Before” and “After” choices. Make sure that those read 0. (The default often has 10 in the After slot, which is creating extra space between the paragraphs. You want it to say 0—so change it. And don’t use “Auto.”)
(10) Since you already set this to double spacing on the previous menu, you should see the word “Double” under “Line Spacing.”
(11) Now click OK. This will take you back to that previous dialog box. Do one more thing here to seal the deal and help you not have to do this again:

(12) At the very bottom, right above that format button, are a couple of choices. Put a dot in the circle that says “New documents based on this template.” Now click OK.
(13) This will take you back to your blank document. Now do a “Save As” and save this document as your own personal template for doing all of your writing. Calling it “Mytemplate” should work. Store it on your desktop and you’ll always have a template ready to go when inspiration strikes. So now you have:
- Manuscript is .doc or .docx
- 12-pt Times New Roman
- Double-spaced copy
- No extra space between paragraphs
- 1-inch margins
- Paragraphs indented—but NOT with tabs or spacing
Every time you start a new book or a new story, open this template, do another “Save As” to save that piece of writing with whatever title you want to give it. That way you’ll always preserve the settings you created in your template and won’t have to redo them every time for every piece of writing.
We’ll continue our tech-y talks in coming weeks to help make sure you’re submitting your documents the way the publishers want them.
If you have some other tech-y questions, write them below and I’ll see what I can help you with in future posts.

Linda, you can’t imagine what a God-send you are with this. I am not of the techy generation, and have had to bumble around, trying to learn formatting on my own. This is so helpful! Thank you.
As for questions, last week I tried to format page numbers with my name/book title/page number at the top right. Each time the page number got bumped to the line below my name/book title. And then the title page ended up with a 0 on it, not what I wanted at all. I will go back and try again, using the clear instructions you sent. Hopefully it will work. Thanks again!
Yay! I am so glad you’re finding this helpful. For those of us who came later to computers (remember trying to make sure we didn’t type off the end of the page on our typewriters?), it can feel daunting. I will certainly work with page numbers in the next post and try to help solve that problem for you.
Great! Will look forward to reading it.